# Frameworks
WebdriverIO Runner has built-in support for [Mocha](http://mochajs.org/), [Jasmine](http://jasmine.github.io/), and [Cucumber.js](https://cucumber.io/). You can also integrate it with 3rd-party open-source frameworks, such as [Serenity/JS](#using-serenityjs).
Integrating WebdriverIO with test frameworks
To integrate WebdriverIO with a test framework, you need an adapter package available on NPM. Note that the adapter package must be installed in the same location where WebdriverIO is installed. So, if you installed WebdriverIO globally, be sure to install the adapter package globally, too.
Integrating WebdriverIO with a test framework lets you access the WebDriver instance using the global `browser` variable in your spec files or step definitions. Note that WebdriverIO will also take care of instantiating and ending the Selenium session, so you don't have to do it yourself.
## Using Mocha[](#using-mocha "Direct link to Using Mocha")
First, install the adapter package from NPM:
* npm
* Yarn
* pnpm
* Bun
```
npm install @wdio/mocha-framework --save-dev
```
```
yarn add @wdio/mocha-framework --dev
```
```
pnpm add @wdio/mocha-framework --save-dev
```
```
bun add @wdio/mocha-framework --dev
```
By default WebdriverIO provides an [assertion library](/docs/assertion.md) that is built-in which you can start right away:
```
describe('my awesome website', () => {
it('should do some assertions', async () => {
await browser.url('https://webdriver.io')
await expect(browser).toHaveTitle('WebdriverIO · Next-gen browser and mobile automation test framework for Node.js | WebdriverIO')
})
})
```
WebdriverIO supports Mocha's `BDD` (default), `TDD`, and `QUnit` [interfaces](https://mochajs.org/#interfaces).
If you like to write your specs in TDD style, set the `ui` property in your `mochaOpts` config to `tdd`. Now your test files should be written like this:
```
suite('my awesome website', () => {
test('should do some assertions', async () => {
await browser.url('https://webdriver.io')
await expect(browser).toHaveTitle('WebdriverIO · Next-gen browser and mobile automation test framework for Node.js | WebdriverIO')
})
})
```
If you want to define other Mocha-specific settings, you can do it with the `mochaOpts` key in your configuration file. A list of all options can be found on the [Mocha project website](https://mochajs.org/api/mocha).
**Note:** WebdriverIO does not support the deprecated usage of `done` callbacks in Mocha:
```
it('should test something', (done) => {
done() // throws "done is not a function"
})
```
### Mocha Options[](#mocha-options "Direct link to Mocha Options")
The following options can be applied in your `wdio.conf.js` to configure your Mocha environment. **Note:** not all options are supported, e.g. applying the `parallel` option will cause an error as the WDIO testrunner has its own way to run tests in parallel. You can pass these framework options as arguments, e.g.:
```
wdio run wdio.conf.ts --mochaOpts.grep "my test" --mochaOpts.bail --no-mochaOpts.checkLeaks
```
This will pass along the following Mocha options:
```
{
grep: ['my-test'],
bail: true
checkLeacks: false
}
```
The following Mocha options are supported:
#### require[](#require "Direct link to require")
The `require` option is useful when you want to add or extend some basic functionality (WebdriverIO framework option).
Type: `string|string[]`
Default: `[]`
#### compilers[](#compilers "Direct link to compilers")
Use the given module(s) to compile files. Compilers will be included before requires (WebdriverIO framework option).
Type: `string[]`
Default: `[]`
#### allowUncaught[](#allowuncaught "Direct link to allowUncaught")
Propagate uncaught errors.
Type: `boolean`
Default: `false`
#### bail[](#bail "Direct link to bail")
Bail after first test failure.
Type: `boolean`
Default: `false`
#### checkLeaks[](#checkleaks "Direct link to checkLeaks")
Check for global variable leaks.
Type: `boolean`
Default: `false`
#### delay[](#delay "Direct link to delay")
Delay root suite execution.
Type: `boolean`
Default: `false`
#### fgrep[](#fgrep "Direct link to fgrep")
Test filter given string.
Type: `string`
Default: `null`
#### forbidOnly[](#forbidonly "Direct link to forbidOnly")
Tests marked `only` fail the suite.
Type: `boolean`
Default: `false`
#### forbidPending[](#forbidpending "Direct link to forbidPending")
Pending tests fail the suite.
Type: `boolean`
Default: `false`
#### fullTrace[](#fulltrace "Direct link to fullTrace")
Full stacktrace upon failure.
Type: `boolean`
Default: `false`
#### global[](#global "Direct link to global")
Variables expected in global scope.
Type: `string[]`
Default: `[]`
#### grep[](#grep "Direct link to grep")
Test filter given regular expression.
Type: `RegExp|string`
Default: `null`
#### invert[](#invert "Direct link to invert")
Invert test filter matches.
Type: `boolean`
Default: `false`
#### retries[](#retries "Direct link to retries")
Number of times to retry failed tests.
Type: `number`
Default: `0`
#### timeout[](#timeout "Direct link to timeout")
Timeout threshold value (in ms).
Type: `number`
Default: `30000`
## Using Jasmine[](#using-jasmine "Direct link to Using Jasmine")
First, install the adapter package from NPM:
* npm
* Yarn
* pnpm
* Bun
```
npm install @wdio/jasmine-framework --save-dev
```
```
yarn add @wdio/jasmine-framework --dev
```
```
pnpm add @wdio/jasmine-framework --save-dev
```
```
bun add @wdio/jasmine-framework --dev
```
You can then configure your Jasmine environment by setting a `jasmineOpts` property in your config. A list of all options can be found on the [Jasmine project website](https://jasmine.github.io/api/3.5/Configuration.html).
### Jasmine Options[](#jasmine-options "Direct link to Jasmine Options")
The following options can be applied in your `wdio.conf.js` to configure your Jasmine environment using the `jasmineOpts` property. For more information on these configuration options, check out the [Jasmine docs](https://jasmine.github.io/api/edge/Configuration). You can pass these framework options as arguments, e.g.:
```
wdio run wdio.conf.ts --jasmineOpts.grep "my test" --jasmineOpts.failSpecWithNoExpectations --no-jasmineOpts.random
```
This will pass along the following Mocha options:
```
{
grep: ['my-test'],
bail: true
checkLeacks: false
}
```
The following Jasmine options are supported:
#### defaultTimeoutInterval[](#defaulttimeoutinterval "Direct link to defaultTimeoutInterval")
Default Timeout Interval for Jasmine operations.
Type: `number`
Default: `60000`
#### helpers[](#helpers "Direct link to helpers")
Array of filepaths (and globs) relative to spec\_dir to include before jasmine specs.
Type: `string[]`
Default: `[]`
#### requires[](#requires "Direct link to requires")
The `requires` option is useful when you want to add or extend some basic functionality.
Type: `string[]`
Default: `[]`
#### random[](#random "Direct link to random")
Whether to randomize spec execution order.
Type: `boolean`
Default: `true`
#### seed[](#seed "Direct link to seed")
Seed to use as the basis of randomization. Null causes the seed to be determined randomly at the start of execution.
Type: `Function`
Default: `null`
#### failSpecWithNoExpectations[](#failspecwithnoexpectations "Direct link to failSpecWithNoExpectations")
Whether to fail the spec if it ran no expectations. By default a spec that ran no expectations is reported as passed. Setting this to true will report such spec as a failure.
Type: `boolean`
Default: `false`
#### oneFailurePerSpec[](#onefailureperspec "Direct link to oneFailurePerSpec")
Whether to cause specs to only have one expectation failure.
Type: `boolean`
Default: `false`
#### specFilter[](#specfilter "Direct link to specFilter")
Function to use to filter specs.
Type: `Function`
Default: `(spec) => true`
#### grep[](#grep-1 "Direct link to grep")
Only run tests matching this string or regexp. (Only applicable if no custom `specFilter` function is set)
Type: `string|Regexp`
Default: `null`
#### invertGrep[](#invertgrep "Direct link to invertGrep")
If true it inverts the matching tests and only runs tests that don't match with the expression used in `grep`. (Only applicable if no custom `specFilter` function is set)
Type: `boolean`
Default: `false`
## Using Cucumber[](#using-cucumber "Direct link to Using Cucumber")
First, install the adapter package from NPM:
* npm
* Yarn
* pnpm
* Bun
```
npm install @wdio/cucumber-framework --save-dev
```
```
yarn add @wdio/cucumber-framework --dev
```
```
pnpm add @wdio/cucumber-framework --save-dev
```
```
bun add @wdio/cucumber-framework --dev
```
If you want to use Cucumber, set the `framework` property to `cucumber` by adding `framework: 'cucumber'` to the [config file](/docs/configurationfile.md) .
Options for Cucumber can be given in the config file with `cucumberOpts`. Check out the whole list of options [here](https://github.com/webdriverio/webdriverio/tree/main/packages/wdio-cucumber-framework#cucumberopts-options).
To get up and running quickly with Cucumber, have a look on our [`cucumber-boilerplate`](https://github.com/webdriverio/cucumber-boilerplate) project that comes with all the step definitions you need to get stared, and you'll be writing feature files right away.
### Cucumber Options[](#cucumber-options "Direct link to Cucumber Options")
The following options can be applied in your `wdio.conf.js` to configure your Cucumber environment using the `cucumberOpts` property:
Adjusting options through the command line
The `cucumberOpts`, such as custom `tags` for filtering tests, can be specified through the command line. This is accomplished by using the `cucumberOpts.{optionName}="value"` format.
For example, if you want to run only the tests that are tagged with `@smoke`, you can use the following command:
```
# When you only want to run tests that hold the tag "@smoke"
npx wdio run ./wdio.conf.js --cucumberOpts.tags="@smoke"
npx wdio run ./wdio.conf.js --cucumberOpts.name="some scenario name" --cucumberOpts.failFast
```
This command sets the `tags` option in `cucumberOpts` to `@smoke`, ensuring that only tests with this tag are executed.
#### backtrace[](#backtrace "Direct link to backtrace")
Show full backtrace for errors.
Type: `Boolean`
Default: `true`
#### requireModule[](#requiremodule "Direct link to requireModule")
Require modules prior to requiring any support files.
Type: `string[]`
Default: `[]`
Example:
```
cucumberOpts: {
requireModule: ['@babel/register']
// or
requireModule: [
[
'@babel/register',
{
rootMode: 'upward',
ignore: ['node_modules']
}
]
]
}
```
#### failFast[](#failfast "Direct link to failFast")
Abort the run on first failure.
Type: `boolean`
Default: `false`
#### name[](#name "Direct link to name")
Only execute the scenarios with name matching the expression (repeatable).
Type: `RegExp[]`
Default: `[]`
#### require[](#require-1 "Direct link to require")
Require files containing your step definitions before executing features. You can also specify a glob to your step definitions.
Type: `string[]`
Default: `[]` Example:
```
cucumberOpts: {
require: [path.join(__dirname, 'step-definitions', 'my-steps.js')]
}
```
#### import[](#import "Direct link to import")
Paths to where your support code is, for ESM.
Type: `String[]`
Default: `[]` Example:
```
cucumberOpts: {
import: [path.join(__dirname, 'step-definitions', 'my-steps.js')]
}
```
#### strict[](#strict "Direct link to strict")
Fail if there are any undefined or pending steps.
Type: `boolean`
Default: `false`
#### tags[](#tags "Direct link to tags")
Only execute the features or scenarios with tags matching the expression. Please see the [Cucumber documentation](https://docs.cucumber.io/cucumber/api/#tag-expressions) for more details.
Type: `String`
Default: \`\`
#### timeout[](#timeout-1 "Direct link to timeout")
Timeout in milliseconds for step definitions.
Type: `Number`
Default: `30000`
#### retry[](#retry "Direct link to retry")
Specify the number of times to retry failing test cases.
Type: `Number`
Default: `0`
#### retryTagFilter[](#retrytagfilter "Direct link to retryTagFilter")
Only retries the features or scenarios with tags matching the expression (repeatable). This option requires '--retry' to be specified.
Type: `RegExp`
#### language[](#language "Direct link to language")
Default language for your feature files
Type: `String`
Default: `en`
#### order[](#order "Direct link to order")
Run tests in defined / random order
Type: `String`
Default: `defined`
#### format[](#format "Direct link to format")
Name and output file path of formatter to use. WebdriverIO primarily supports only the [Formatters](https://github.com/cucumber/cucumber-js/blob/main/docs/formatters.md) that writes output to a file.
Type: `string[]`
#### formatOptions[](#formatoptions "Direct link to formatOptions")
Options to be provided to formatters
Type: `object`
#### tagsInTitle[](#tagsintitle "Direct link to tagsInTitle")
Add cucumber tags to feature or scenario name
Type: `Boolean`
Default: `false`
***Please note that this is a @wdio/cucumber-framework specific option and not recognized by cucumber-js itself***
#### ignoreUndefinedDefinitions[](#ignoreundefineddefinitions "Direct link to ignoreUndefinedDefinitions")
Treat undefined definitions as warnings.
Type: `Boolean`
Default: `false`
***Please note that this is a @wdio/cucumber-framework specific option and not recognized by cucumber-js itself***
#### failAmbiguousDefinitions[](#failambiguousdefinitions "Direct link to failAmbiguousDefinitions")
Treat ambiguous definitions as errors.
Type: `Boolean`
Default: `false`
***Please note that this is a @wdio/cucumber-framework specific option and not recognized by cucumber-js itself***
#### tagExpression[](#tagexpression "Direct link to tagExpression")
Only execute the features or scenarios with tags matching the expression. Please see the [Cucumber documentation](https://docs.cucumber.io/cucumber/api/#tag-expressions) for more details.
Type: `String`
Default: \`\`
***Please note that this option would be deprecated in future. Use [`tags`](#tags) config property instead***
#### profile[](#profile "Direct link to profile")
Specify the profile to use.
Type: `string[]`
Default: `[]`
***Kindly take note that only specific values (worldParameters, name, retryTagFilter) are supported within profiles, as `cucumberOpts` takes precedence. Additionally, when using a profile, make sure that the mentioned values are not declared within `cucumberOpts`.***
### Skipping tests in cucumber[](#skipping-tests-in-cucumber "Direct link to Skipping tests in cucumber")
Note that if you want to skip a test using regular cucumber test filtering capabilities available in `cucumberOpts`, you will do it for all the browsers and devices configured in the capabilities. In order to be able to skip scenarios only for specific capabilities combinations without having a session started if not necessary, webdriverio provides the following specific tag syntax for cucumber:
`@skip([condition])`
were condition is an optional combination of capabilities properties with their values that when **all** matched with cause the tagged scenario or feature to be skipped. Of course you can add several tags to scenarios and features to skip a tests under several different conditions.
You can also use the '@skip' annotation to skip tests without changing \`tagExpression'. In this case the skipped tests will be displayed in the test report.
Here you have some examples of this syntax:
* `@skip` or `@skip()`: will always skip the tagged item
* `@skip(browserName="chrome")`: the test will not be executed against chrome browsers.
* `@skip(browserName="firefox";platformName="linux")`: will skip the test in firefox over linux executions.
* `@skip(browserName=["chrome","firefox"])`: tagged items will be skipped for both chrome and firefox browsers.
* `@skip(browserName=/i.*explorer/)`: capabilities with browsers matching the regexp will be skipped (like `iexplorer`, `internet explorer`, `internet-explorer`, ...).
### Import Step Definition Helper[](#import-step-definition-helper "Direct link to Import Step Definition Helper")
In order to use step definition helper like `Given`, `When` or `Then` or hooks, you are suppose to import then from `@cucumber/cucumber`, e.g. like this:
```
import { Given, When, Then } from '@cucumber/cucumber'
```
Now, if you use Cucumber already for other types of tests unrelated to WebdriverIO for which you use a specific version you need to import these helpers in your e2e tests from the WebdriverIO Cucumber package, e.g.:
```
import { Given, When, Then, world, context } from '@wdio/cucumber-framework'
```
This ensures that you use the right helpers within the WebdriverIO framework and allows you to use an independent Cucumber version for other types of testing.
### Publishing Report[](#publishing-report "Direct link to Publishing Report")
Cucumber provides a feature to publish your test run reports to `https://reports.cucumber.io/`, which can be controlled either by setting the `publish` flag in `cucumberOpts` or by configuring the `CUCUMBER_PUBLISH_TOKEN` environment variable. However, when you use `WebdriverIO` for test execution, there's a limitation with this approach. It updates the reports separately for each feature file, making it difficult to view a consolidated report.
To overcome this limitation, we've introduced a promise-based method called `publishCucumberReport` within `@wdio/cucumber-framework`. This method should be called in the `onComplete` hook, which is the optimal place to invoke it. `publishCucumberReport` requires the input of the report directory where cucumber message reports are stored.
You can generate `cucumber message` reports by configuring the `format` option in your `cucumberOpts`. It's highly recommended to provide a dynamic file name within the `cucumber message` format option to prevent overwriting reports and ensure that each test run is accurately recorded.
Before using this function, make sure to set the following environment variables:
* CUCUMBER\_PUBLISH\_REPORT\_URL: The URL where you want to publish the Cucumber report. If not provided, the default URL '' will be used.
* CUCUMBER\_PUBLISH\_REPORT\_TOKEN: The authorization token required to publish the report. If this token is not set, the function will exit without publishing the report.
Here's an example of the necessary configurations and code samples for implementation:
```
import { v4 as uuidv4 } from 'uuid'
import { publishCucumberReport } from '@wdio/cucumber-framework';
export const config = {
// ... Other Configuration Options
cucumberOpts: {
// ... Cucumber Options Configuration
format: [
['message', `./reports/${uuidv4()}.ndjson`],
['json', './reports/test-report.json']
]
},
async onComplete() {
await publishCucumberReport('./reports');
}
}
```
Please note that `./reports/` is the directory where `cucumber message` reports will be stored.
## Using Serenity/JS[](#using-serenityjs "Direct link to Using Serenity/JS")
[Serenity/JS](https://serenity-js.org?pk_campaign=wdio8\&pk_source=webdriver.io) is an open-source framework designed to make acceptance and regression testing of complex software systems faster, more collaborative, and easier to scale.
For WebdriverIO test suites, Serenity/JS offers:
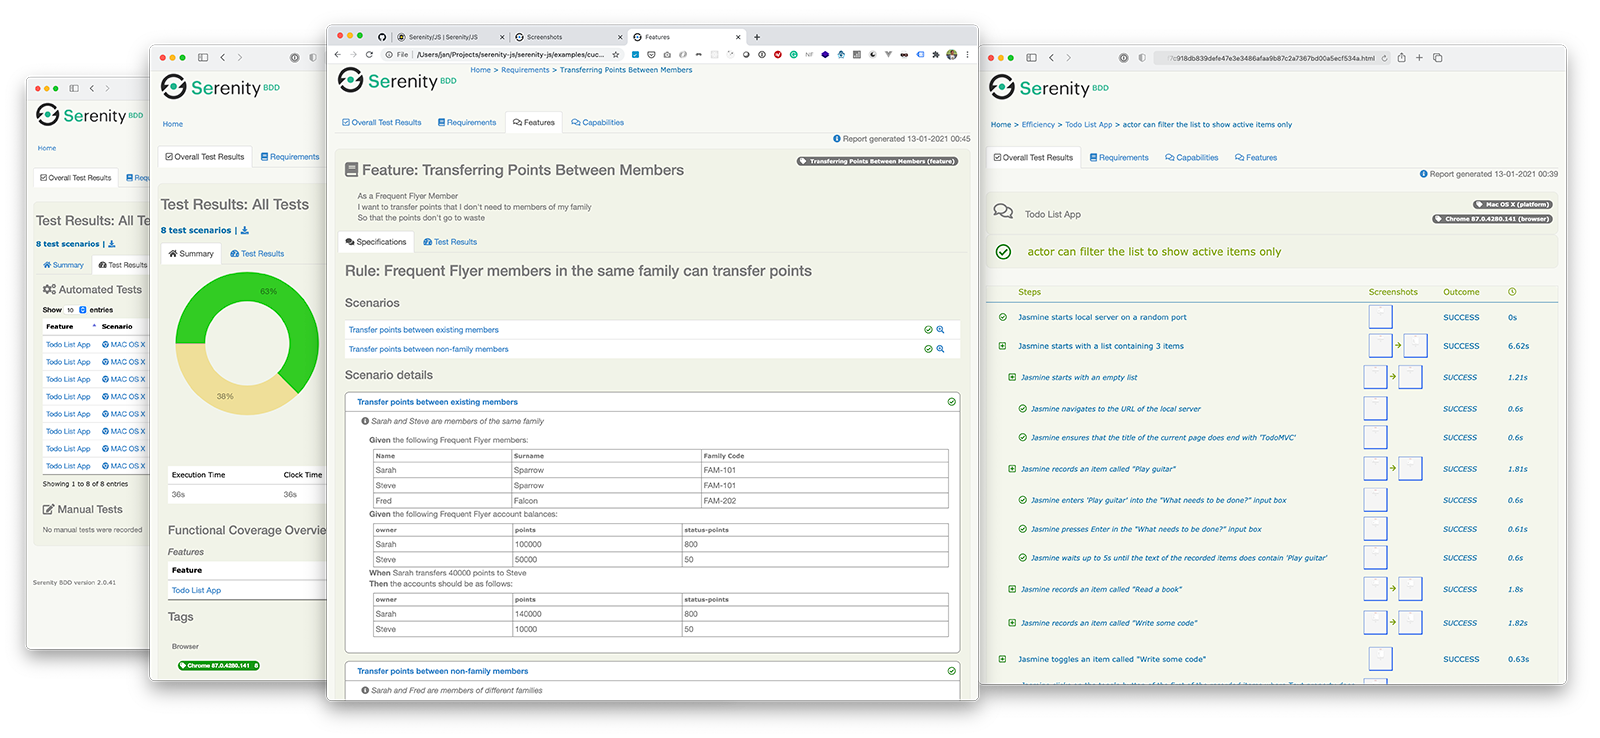
* [Enhanced Reporting](https://serenity-js.org/handbook/reporting/?pk_campaign=wdio8\&pk_source=webdriver.io) - You can use Serenity/JS as a drop-in replacement of any built-in WebdriverIO framework to produce in-depth test execution reports and living documentation of your project.
* [Screenplay Pattern APIs](https://serenity-js.org/handbook/design/screenplay-pattern/?pk_campaign=wdio8\&pk_source=webdriver.io) - To make your test code portable and reusable across projects and teams, Serenity/JS gives you an optional [abstraction layer](https://serenity-js.org/api/webdriverio?pk_campaign=wdio8\&pk_source=webdriver.io) on top of native WebdriverIO APIs.
* [Integration Libraries](https://serenity-js.org/api/core/?pk_campaign=wdio8\&pk_source=webdriver.io) - For test suites that follow the Screenplay Pattern, Serenity/JS also provides optional integration libraries to help you write [API tests](https://serenity-js.org/api/rest/?pk_campaign=wdio8\&pk_source=webdriver.io), [manage local servers](https://serenity-js.org/api/local-server/?pk_campaign=wdio8\&pk_source=webdriver.io), [perform assertions](https://serenity-js.org/api/assertions/?pk_campaign=wdio8\&pk_source=webdriver.io), and more!
### Installing Serenity/JS[](#installing-serenityjs "Direct link to Installing Serenity/JS")
To add Serenity/JS to an [existing WebdriverIO project](https://webdriver.io/docs/gettingstarted), install the following Serenity/JS modules from NPM:
* npm
* Yarn
* pnpm
* Bun
```
npm install @serenity-js/{core,web,webdriverio,assertions,console-reporter,serenity-bdd} --save-dev
```
```
yarn add @serenity-js/{core,web,webdriverio,assertions,console-reporter,serenity-bdd} --dev
```
```
pnpm add @serenity-js/{core,web,webdriverio,assertions,console-reporter,serenity-bdd} --save-dev
```
```
bun add @serenity-js/{core,web,webdriverio,assertions,console-reporter,serenity-bdd} --dev
```
Learn more about Serenity/JS modules:
* [`@serenity-js/core`](https://serenity-js.org/api/core/?pk_campaign=wdio8\&pk_source=webdriver.io)
* [`@serenity-js/web`](https://serenity-js.org/api/web/?pk_campaign=wdio8\&pk_source=webdriver.io)
* [`@serenity-js/webdriverio`](https://serenity-js.org/api/webdriverio/?pk_campaign=wdio8\&pk_source=webdriver.io)
* [`@serenity-js/assertions`](https://serenity-js.org/api/assertions/?pk_campaign=wdio8\&pk_source=webdriver.io)
* [`@serenity-js/console-reporter`](https://serenity-js.org/api/console-reporter/?pk_campaign=wdio8\&pk_source=webdriver.io)
* [`@serenity-js/serenity-bdd`](https://serenity-js.org/api/serenity-bdd/?pk_campaign=wdio8\&pk_source=webdriver.io)
### Configuring Serenity/JS[](#configuring-serenityjs "Direct link to Configuring Serenity/JS")
To enable integration with Serenity/JS, configure WebdriverIO as follows:
* TypeScript
* JavaScript
wdio.conf.ts
```
import { WebdriverIOConfig } from '@serenity-js/webdriverio';
export const config: WebdriverIOConfig = {
// Tell WebdriverIO to use Serenity/JS framework
framework: '@serenity-js/webdriverio',
// Serenity/JS configuration
serenity: {
// Configure Serenity/JS to use the appropriate adapter for your test runner
runner: 'cucumber',
// runner: 'mocha',
// runner: 'jasmine',
// Register Serenity/JS reporting services, a.k.a. the "stage crew"
crew: [
// Optional, print test execution results to standard output
'@serenity-js/console-reporter',
// Optional, produce Serenity BDD reports and living documentation (HTML)
'@serenity-js/serenity-bdd',
[ '@serenity-js/core:ArtifactArchiver', { outputDirectory: 'target/site/serenity' } ],
// Optional, automatically capture screenshots upon interaction failure
[ '@serenity-js/web:Photographer', { strategy: 'TakePhotosOfFailures' } ],
]
},
// Configure your Cucumber runner
cucumberOpts: {
// see Cucumber configuration options below
},
// ... or Jasmine runner
jasmineOpts: {
// see Jasmine configuration options below
},
// ... or Mocha runner
mochaOpts: {
// see Mocha configuration options below
},
runner: 'local',
// Any other WebdriverIO configuration
};
```
wdio.conf.js
```
export const config = {
// Tell WebdriverIO to use Serenity/JS framework
framework: '@serenity-js/webdriverio',
// Serenity/JS configuration
serenity: {
// Configure Serenity/JS to use the appropriate adapter for your test runner
runner: 'cucumber',
// runner: 'mocha',
// runner: 'jasmine',
// Register Serenity/JS reporting services, a.k.a. the "stage crew"
crew: [
'@serenity-js/console-reporter',
'@serenity-js/serenity-bdd',
[ '@serenity-js/core:ArtifactArchiver', { outputDirectory: 'target/site/serenity' } ],
[ '@serenity-js/web:Photographer', { strategy: 'TakePhotosOfFailures' } ],
]
},
// Configure your Cucumber runner
cucumberOpts: {
// see Cucumber configuration options below
},
// ... or Jasmine runner
jasmineOpts: {
// see Jasmine configuration options below
},
// ... or Mocha runner
mochaOpts: {
// see Mocha configuration options below
},
runner: 'local',
// Any other WebdriverIO configuration
};
```
Learn more about:
* [Serenity/JS Cucumber configuration options](https://serenity-js.org/api/cucumber-adapter/interface/CucumberConfig/?pk_campaign=wdio8\&pk_source=webdriver.io)
* [Serenity/JS Jasmine configuration options](https://serenity-js.org/api/jasmine-adapter/interface/JasmineConfig/?pk_campaign=wdio8\&pk_source=webdriver.io)
* [Serenity/JS Mocha configuration options](https://serenity-js.org/api/mocha-adapter/interface/MochaConfig/?pk_campaign=wdio8\&pk_source=webdriver.io)
* [WebdriverIO configuration file](/docs/configurationfile.md)
### Producing Serenity BDD reports and living documentation[](#producing-serenity-bdd-reports-and-living-documentation "Direct link to Producing Serenity BDD reports and living documentation")
[Serenity BDD reports and living documentation](https://serenity-bdd.github.io/docs/reporting/the_serenity_reports) are generated by [Serenity BDD CLI](https://github.com/serenity-bdd/serenity-core/tree/main/serenity-cli), a Java program downloaded and managed by the [`@serenity-js/serenity-bdd`](https://serenity-js.org/api/serenity-bdd/?pk_campaign=wdio8\&pk_source=webdriver.io) module.
To produce Serenity BDD reports, your test suite must:
* download the Serenity BDD CLI, by calling `serenity-bdd update` which caches the CLI `jar` locally
* produce intermediate Serenity BDD `.json` reports, by registering [`SerenityBDDReporter`](https://serenity-js.org/api/serenity-bdd/class/SerenityBDDReporter/?pk_campaign=wdio8\&pk_source=webdriver.io) as per the [configuration instructions](#configuring-serenityjs)
* invoke the Serenity BDD CLI when you want to produce the report, by calling `serenity-bdd run`
The pattern used by all the [Serenity/JS Project Templates](https://serenity-js.org/handbook/project-templates/?pk_campaign=wdio8\&pk_source=webdriver.io#webdriverio) relies on using:
* a [`postinstall`](https://docs.npmjs.com/cli/v9/using-npm/scripts#life-cycle-operation-order) NPM script to download the Serenity BDD CLI
* [`npm-failsafe`](https://www.npmjs.com/package/npm-failsafe) to run the reporting process even if the test suite itself has failed (which is precisely when you need test reports the most...).
* [`rimraf`](https://www.npmjs.com/package/rimraf) as a convenience method to remove any test reports left over from the previous run
package.json
```
{
"scripts": {
"postinstall": "serenity-bdd update",
"clean": "rimraf target",
"test": "failsafe clean test:execute test:report",
"test:execute": "wdio wdio.conf.ts",
"test:report": "serenity-bdd run"
}
}
```
To learn more about the `SerenityBDDReporter`, please consult:
* installation instructions in [`@serenity-js/serenity-bdd` documentation](https://serenity-js.org/api/serenity-bdd/?pk_campaign=wdio8\&pk_source=webdriver.io),
* configuration examples in [`SerenityBDDReporter` API docs](https://serenity-js.org/api/serenity-bdd/class/SerenityBDDReporter/?pk_campaign=wdio8\&pk_source=webdriver.io),
* [Serenity/JS examples on GitHub](https://github.com/serenity-js/serenity-js/tree/main/examples).
### Using Serenity/JS Screenplay Pattern APIs[](#using-serenityjs-screenplay-pattern-apis "Direct link to Using Serenity/JS Screenplay Pattern APIs")
The [Screenplay Pattern](https://serenity-js.org/handbook/design/screenplay-pattern/?pk_campaign=wdio8\&pk_source=webdriver.io) is an innovative, user-centred approach to writing high-quality automated acceptance tests. It steers you towards an effective use of layers of abstraction, helps your test scenarios capture the business vernacular of your domain, and encourages good testing and software engineering habits on your team.
By default, when you register `@serenity-js/webdriverio` as your WebdriverIO `framework`, Serenity/JS configures a default [cast](https://serenity-js.org/api/core/class/Cast/?pk_campaign=wdio8\&pk_source=webdriver.io) of [actors](https://serenity-js.org/api/core/class/Actor/?pk_campaign=wdio8\&pk_source=webdriver.io), where every actor can:
* [`BrowseTheWebWithWebdriverIO`](https://serenity-js.org/api/webdriverio/class/BrowseTheWebWithWebdriverIO/?pk_campaign=wdio8\&pk_source=webdriver.io)
* [`TakeNotes.usingAnEmptyNotepad()`](https://serenity-js.org/api/core/class/TakeNotes/?pk_campaign=wdio8\&pk_source=webdriver.io)
This should be enough to help you get started with introducing test scenarios that follow the Screenplay Pattern even to an existing test suite, for example:
specs/example.spec.ts
```
import { actorCalled } from '@serenity-js/core'
import { Navigate, Page } from '@serenity-js/web'
import { Ensure, equals } from '@serenity-js/assertions'
describe('My awesome website', () => {
it('can have test scenarios that follow the Screenplay Pattern', async () => {
await actorCalled('Alice').attemptsTo(
Navigate.to(`https://webdriver.io`),
Ensure.that(
Page.current().title(),
equals(`WebdriverIO · Next-gen browser and mobile automation test framework for Node.js | WebdriverIO`)
),
)
})
it('can have non-Screenplay scenarios too', async () => {
await browser.url('https://webdriver.io')
await expect(browser)
.toHaveTitle('WebdriverIO · Next-gen browser and mobile automation test framework for Node.js | WebdriverIO')
})
})
```
To learn more about the Screenplay Pattern, check out:
* [The Screenplay Pattern](https://serenity-js.org/handbook/design/screenplay-pattern/?pk_campaign=wdio8\&pk_source=webdriver.io)
* [Web testing with Serenity/JS](https://serenity-js.org/handbook/web-testing/?pk_campaign=wdio8\&pk_source=webdriver.io)
* ["BDD in Action, Second Edition"](https://www.manning.com/books/bdd-in-action-second-edition)