> wdio-video-reporter is a 3rd party package, for more information please see [GitHub](https://github.com/webdriverio-community/wdio-video-reporter) | [npm](https://www.npmjs.com/package/wdio-video-reporter)
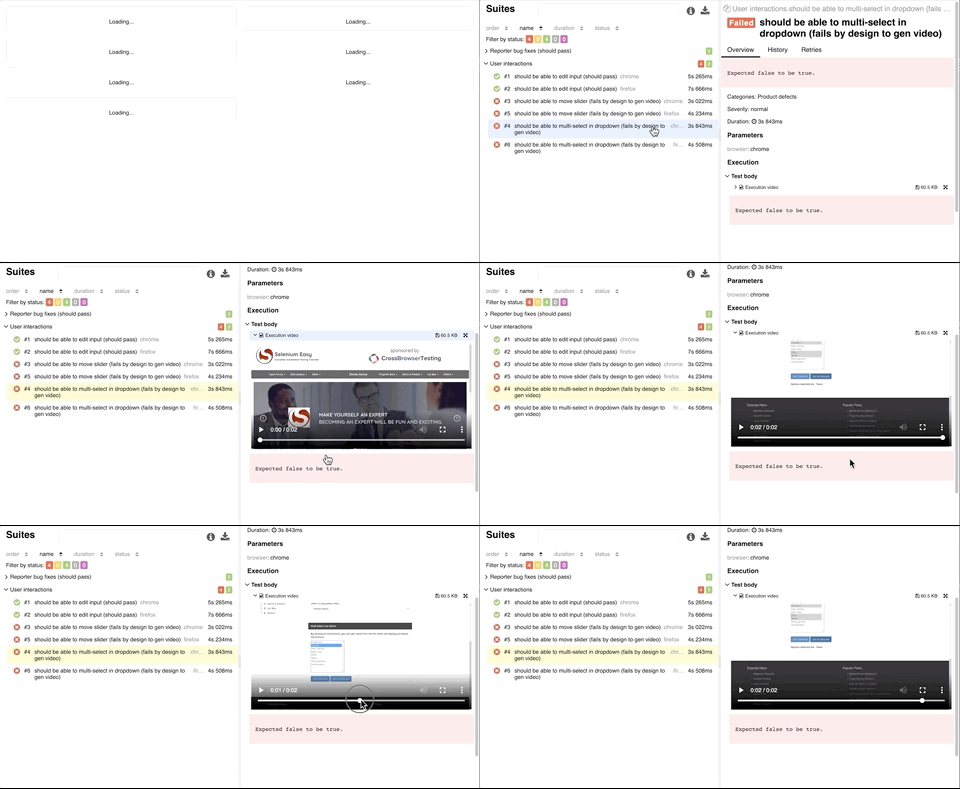
> Create a video screen capture of your tests and enhanced your Allure reporting easily!
This is a [WebdriverIO](https://webdriver.io/) reporter that generates videos of your test executions. If you use it in combination with the [Allure Reporter](https://webdriver.io/docs/allure-reporter), then the test cases automatically get decorated with the videos as well (see [example project](https://presidenten.github.io/wdio-video-reporter-example-report/)).
As this reporter is using the [`saveScreenshot`](https://webdriver.io/docs/api/element/saveScreenshot/) command to render the video it supports all environments including mobile environments.
That said, taking a screenshot after almost every command can slow down your tests. Also, note that the videos don't include alert-boxes and popups.
# Installation
First, install the reporter:
```
npm install --save-dev wdio-video-reporter
```
or
```
yarn add --dev wdio-video-reporter
```
Then add the reporter to your configuration:
```
reporters: [
['video', {
saveAllVideos: false, // If true, also saves videos for successful test cases
videoSlowdownMultiplier: 3, // Higher to get slower videos, lower for faster videos [Value 1-100]
}],
],
```
# Usage
## With [Allure Reporter](https://webdriver.io/docs/allure-reporter)[](#with-allure-reporter "Direct link to with-allure-reporter")
Adding the Allure reporter as well automatically updates the reports with videos without any need to configure anything :-)
```
reporters: [
['video', {
saveAllVideos: false, // If true, also saves videos for successful test cases
videoSlowdownMultiplier: 3, // Higher to get slower videos, lower for faster videos [Value 1-100]
}],
['allure', {
outputDir: './_results_/allure-raw',
disableWebdriverStepsReporting: true,
disableWebdriverScreenshotsReporting: true,
}],
],
```
## With [`wdio-html-nice-reporter`](https://github.com/rpii/wdio-html-reporter)[](#with-wdio-html-nice-reporter "Direct link to with-wdio-html-nice-reporter")
Adding the html nice reporter automatically updates the reports with videos without any need to configure anything 🙂
```
reporters: [
['video', {
saveAllVideos: false, // If true, also saves videos for successful test cases
videoSlowdownMultiplier: 3, // Higher to get slower videos, lower for faster videos [Value 1-100]
outputDir: './reports/html-reports/',
}],
['html-nice', {
outputDir: './reports/html-reports/',
filename: 'report.html',
reportTitle: 'Test Report Title',
linkScreenshots: true,
//to show the report in a browser when done
showInBrowser: true,
collapseTests: false,
//to turn on screenshots after every test must be false to use video
useOnAfterCommandForScreenshot: false,
}],
],
```
# Configuration
Most users may want to set these configurations:
### `saveAllVideos`[](#saveallvideos "Direct link to saveallvideos")
Set to true to save videos for passing tests.
Type: `boolean`
Default: `false`
### `rawPath`[](#rawpath "Direct link to rawpath")
Where to save the screenshots for the video.
Type: `string`
Default: `.video-reporter-screenshots`
### `filenamePrefixSource`[](#filenameprefixsource "Direct link to filenameprefixsource")
Prefix for video filenames by either suite or test name. When using cucumber it will always be suite.
Type: `'suite' | 'test'`
Default: `test`
### `videoSlowdownMultiplier`[](#videoslowdownmultiplier "Direct link to videoslowdownmultiplier")
Integer between \[1-100]. Increase if videos are playing to quick.
Type: `number`
Default: `3`
### `videoScale`[](#videoscale "Direct link to videoscale")
Scaling of video. See .
Type: `string`
Default: `'1200:trunc(ow/a/2)*2'`
### `videoRenderTimeout`[](#videorendertimeout "Direct link to videorendertimeout")
Maximum time to wait for a video to finish rendering (in ms).
Type: `number`
Default: `5000`
### `outputDir`[](#outputdir "Direct link to outputdir")
If it's not set, it uses [`outputDir`](https://webdriver.io/docs/configuration#outputdir).
Type: `string`
### `maxTestNameCharacters`[](#maxtestnamecharacters "Direct link to maxtestnamecharacters")
Max length of test name.
Type: `number`
Default: `250`
### `snapshotCommands`[](#snapshotcommands "Direct link to snapshotcommands")
Which commands should result in a screenshot (without: `/session/:sessionId/`).
Type: `string[]`
Default: `['url', 'forward', 'back', 'refresh', 'execute', 'size', 'position', 'maximize', 'click', 'submit', 'value', 'keys', 'clear', 'selected', 'enabled', 'displayed', 'orientation', 'alert_text', 'accept_alert', 'dismiss_alert', 'moveto', 'buttondown', 'buttonup', 'doubleclick', 'down', 'up', 'move', 'scroll', 'doubleclick', 'longclick', 'flick', 'location']`
### `excludedActions`[](#excludedactions "Direct link to excludedactions")
Add actions where screenshots are unnecessary.
Type: `string[]`
Default: `[]`
### `recordAllActions`[](#recordallactions "Direct link to recordallactions")
Skip filtering and screenshot everything. (Not recommended)
Type: `boolean`
Default: `false`
### `screenshotIntervalSecs`[](#screenshotintervalsecs "Direct link to screenshotintervalsecs")
Force a screenshot at this interval (minimum 0.5s).
Type: `number`
### `videoFormat`[](#videoformat "Direct link to videoformat")
Video format (container) to be used. Supported formats: `mp4`, `webm`.
Type: `string`
Default: `webm`
### `onlyRecordLastFailure`[](#onlyrecordlastfailure "Direct link to onlyrecordlastfailure")
Only record the last failure when `specFileRetries` is > 0
Type: `boolean`
Default: `false`
## Cucumber Support[](#cucumber-support "Direct link to Cucumber Support")
If you are using the Allure reporter with Cucumber, add `useCucumberStepReporter: true` to Allure option in `wdio.conf.js` file, a typical configuration would look like this:
```
reporters: [
['video', {
saveAllVideos: false, // If true, also saves videos for successful test cases
videoSlowdownMultiplier: 3, // Higher to get slower videos, lower for faster videos [Value 1-100]
}],
['allure', {
outputDir: './_results_/allure-raw',
disableWebdriverStepsReporting: true,
disableWebdriverScreenshotsReporting: true,
useCucumberStepReporter: true
}],
],
```
For a complete example, check out the cucumber branch at the [wdio-template](https://github.com/presidenten/wdio-template/tree/cucumber)
## Appium Support[](#appium-support "Direct link to Appium Support")
Since `wdio-video-reporter` v1.2.4 there is support to help Allure differentiate between safari and chrome browsers on desktop and devices. The reporter uses the custom property `appium:deviceType` to id the different devices. Recommended values are `phone` and `tablet`. It is recommended to include `browserVersion` as well for *all* browsers to avoid a bug in Chrome webdriver when using devices in same Selenium grid as desktop Chrome browsers.
The generated video files will also get `appium:deviceType` added to the browser name.
Example Appium configuration:
```
"capabilities": [
{
...
"deviceType": "phone",
"browserVersion": "73.0-phone-1",
...
}
],
```
And `wdio.conf.js`:
```
capabilities: [
{
...
'appium:deviceType': 'phone',
'browserVersion': '73.0-phone-1',
...
},
],
```
# Example
Check out the simple template at [wdio-template](https://github.com/presidenten/wdio-template) to quickly get up to speed.
Clone one of the repositories and install dependencies with `yarn` or `npm install`. Then run `yarn e2e` or `npm run e2e` in demo directory and finally `yarn report` or `npm run report` to see Allure report.
# Contributing
Fork, make changes, write some tests, lint, run tests, build, and verify in the demo that changes work as they should, then make a PR.
The demo folder works with the built version of the library, so make sure to build if you added new features and want to try them out.
# Thanks
Thanks to [Johnson E](https://github.com/jonn-set) for fixing Cucumber support which a lot of users have asked for.