فریمورکها
WebdriverIO Runner از Mocha، Jasmine، و Cucumber.js به صورت پیشفرض پشتیبانی میکند. شما همچنین میتوانید آن را با فریمورکهای متنباز شخص ثالث، مانند Serenity/JS ادغام کنید.
برای ادغام WebdriverIO با یک فریمورک تست، شما نیاز به یک بسته adapter دارید که در NPM در دسترس باشد. توجه داشته باشید که بسته adapter باید در همان محلی نصب شود که WebdriverIO نصب شده است. بنابراین، اگر WebdriverIO را به صورت جهانی نصب کردهاید، مطمئن شوید که بسته adapter را نیز به صورت جهانی نصب کنید.
ادغام WebdriverIO با یک فریمورک تست به شما امکان میدهد به نمونه WebDriver با استفاده از متغیر جهانی browser
در فایلهای spec یا تعاریف قدمهای خود دسترسی داشته باشید.
توجه کنید که WebdriverIO همچنین مسئول ایجاد و پایان دادن به جلسه Selenium خواهد بود، بنابراین نیازی نیست که خودتان این کار را انجام دهید.
استفاده از Mocha
ابتدا، بسته adapter را از NPM نصب کنید:
- npm
- Yarn
- pnpm
npm install @wdio/mocha-framework --save-dev
yarn add @wdio/mocha-framework --dev
pnpm add @wdio/mocha-framework --save-dev
به طور پیشفرض WebdriverIO یک کتابخانه assertion ارائه میدهد که به صورت داخلی ساخته شده و میتوانید بلافاصله از آن استفاده کنید:
describe('my awesome website', () => {
    it('should do some assertions', async () => {
        await browser.url('https://webdriver.io')
        await expect(browser).toHaveTitle('WebdriverIO · Next-gen browser and mobile automation test framework for Node.js | WebdriverIO')
    })
})
WebdriverIO از رابطهای BDD (پیشفرض)، TDD، و QUnit Mocha پشتیبانی میکند.
اگر میخواهید specهای خود را با سبک TDD بنویسید، ویژگی ui را در تنظیمات mochaOpts خود به tdd تنظیم کنید. اکنون فایلهای تست شما باید به صورت زیر نوشته شوند:
suite('my awesome website', () => {
    test('should do some assertions', async () => {
        await browser.url('https://webdriver.io')
        await expect(browser).toHaveTitle('WebdriverIO · Next-gen browser and mobile automation test framework for Node.js | WebdriverIO')
    })
})
اگر میخواهید تنظیمات خاص Mocha دیگری را تعریف کنید، میتوانید این کار را با کلید mochaOpts در فایل پیکربندی خود انجام دهید. لیستی از تمام گزینهها را میتوانید در وبسایت پروژه Mocha پیدا کنید.
نکته: WebdriverIO از استفاده منسوخ شده از callback های done در Mocha پشتیبانی نمیکند:
it('should test something', (done) => {
done() // خطای "done is not a function" را میاندازد
})
گزینههای Mocha
گزینههای زیر را میتوان در wdio.conf.js شما اعمال کرد تا محیط Mocha خود را پیکربندی کنید. نکته: همه گزینهها پشتیبانی نمیشوند، مثلاً اعمال گزینه parallel منجر به خطا میشود زیرا testrunner WDIO روش خاص خود را برای اجرای تستها به صورت موازی دارد. میتوانید این گزینههای فریمورک را به عنوان آرگومان ارسال کنید، به عنوان مثال:
wdio run wdio.conf.ts --mochaOpts.grep "my test" --mochaOpts.bail --no-mochaOpts.checkLeaks
این دستور گزینههای Mocha زیر را ارسال میکند:
{
    grep: ['my-test'],
    bail: true
    checkLeacks: false
}
گزینههای Mocha زیر پشتیبانی میشوند:
require
گزینه require زمانی مفید است که میخواهید برخی قابلیتهای اساسی را اضافه یا گسترش دهید (گزینه فریمورک WebdriverIO).
نوع: string|string[]
پیشفرض: []
compilers
از ماژول(های) داده شده برای کامپایل فایلها استفاده کنید. کامپایلرها قبل از نیازمندیها اضافه میشوند (گزینه فریمورک WebdriverIO).
نوع: string[]
پیشفرض: []
allowUncaught
انتشار خطاهای مدیریت نشده.
نوع: boolean
پیشفرض: false
bail
توقف پس از اولین شکست تست.
نوع: boolean
پیشفرض: false
checkLeaks
بررسی نشت متغیرهای جهانی.
نوع: boolean
پیشفرض: false
delay
تاخیر در اجرای سوئیت اصلی.
نوع: boolean
پیشفرض: false
fgrep
فیلتر تست با رشته داده شده.
نوع: string
پیشفرض: null
forbidOnly
تستهای علامتگذاری شده با only باعث شکست سوئیت میشوند.
نوع: boolean
پیشفرض: false
forbidPending
تستهای معلق باعث شکست سوئیت میشوند.
نوع: boolean
پیشفرض: false
fullTrace
استکتریس کامل در صورت شکست.
نوع: boolean
پیشفرض: false
global
متغیرهای مورد انتظار در دامنه جهانی.
نوع: string[]
پیشفرض: []
grep
فیلتر تست با عبارت منظم داده شده.
نوع: RegExp|string
پیشفرض: null
invert
معکوس کردن تطابق فیلتر تست.
نوع: boolean
پیشفرض: false
retries
تعداد دفعات تلاش مجدد برای تستهای ناموفق.
نوع: number
پیشفرض: 0
timeout
مقدار آستانه زمان ا�نتظار (به میلیثانیه).
نوع: number
پیشفرض: 30000
استفاده از Jasmine
ابتدا، بسته adapter را از NPM نصب کنید:
- npm
- Yarn
- pnpm
npm install @wdio/jasmine-framework --save-dev
yarn add @wdio/jasmine-framework --dev
pnpm add @wdio/jasmine-framework --save-dev
سپس میتوانید محیط Jasmine خود را با تنظیم یک ویژگی jasmineOpts در پیکربندی خود تنظیم کنید. لیستی از تمام گزینهها را میتوانید در وبسایت پروژه Jasmine پیدا کنید.
گزینههای Jasmine
گزینههای زیر را میتوان در wdio.conf.js شما با استفاده از ویژگی jasmineOpts برای پیکربندی محیط Jasmine خود اعمال کرد. برای اطلاعات بیشتر در مورد این گزینههای پیکربندی، مستندات Jasmine را بررسی کنید. میتوانید این گزینههای فریمورک را به عنوان آرگومان ارسال کنید، به عنوان مثال:
wdio run wdio.conf.ts --jasmineOpts.grep "my test" --jasmineOpts.failSpecWithNoExpectations --no-jasmineOpts.random
این دستور گزینههای Mocha زیر را ارسال میکند:
{
    grep: ['my-test'],
    bail: true
    checkLeacks: false
}
گزینههای Jasmine زیر پشتیبانی میشوند:
defaultTimeoutInterval
فاصله زمانی انتظار پیشفرض برای عملیاتهای Jasmine.
نوع: number
پیشفرض: 60000
helpers
آرایهای از مسیرهای فایل (و الگوها) نسبت به spec_dir برای اضافه کردن قبل از اجرای spec های jasmine.
نوع: string[]
پیشفرض: []
requires
گزینه requires زمانی مفید است که میخواهید برخی قابلیتهای اساسی را اضافه یا گسترش دهید.
نوع: string[]
پیشفرض: []
random
آیا ترتیب اجرای spec تصادفی باشد.
نوع: boolean
پیشفرض: true
seed
بذر مورد استفاده به عنوان اساس تصادفیسازی. Null باعث میشود بذر به صورت تصادفی در ابتدای اجرا تعیین شود.
نوع: Function
پیشفرض: null
failSpecWithNoExpectations
آیا spec شکست بخورد اگر هیچ انتظاری را اجرا نکرده است. به طور پیشفرض، یک spec که هیچ انتظاری را اجرا نکرده به عنوان قبول شده گزارش میشود. تنظیم این به true چنین spec را به عنوان شکست گزارش میکند.
نوع: boolean
پیشفرض: false
oneFailurePerSpec
آیا spec ها فقط یک شکست انتظار داشته باشند.
نوع: boolean
پیشفرض: false
specFilter
تابعی برای استفاده در فیلتر کردن spec ها.
نوع: Function
پیشفرض: (spec) => true
grep
فقط تستهایی را اجرا کنید که با این رشته یا regexp مطابقت دارند. (فقط در صورتی که تابع specFilter سفارشی تنظیم نشده باشد)
نوع: string|Regexp
پیشفرض: null
invertGrep
اگر true باشد، تستهای مطابق را معکوس میکند و فقط تستهایی را اجرا میکند که با عبارت استفاده شده در grep مطابقت ندارند. (فقط در صورتی که تابع specFilter سفارشی تنظیم نشده باشد)
نوع: boolean
پیشفرض: false
استفاده از Cucumber
ابتدا، بسته adapter را از NPM نصب کنید:
- npm
- Yarn
- pnpm
npm install @wdio/cucumber-framework --save-dev
yarn add @wdio/cucumber-framework --dev
pnpm add @wdio/cucumber-framework --save-dev
اگر میخواهید از Cucumber استفاد�ه کنید، ویژگی framework را به cucumber تنظیم کنید با افزودن framework: 'cucumber' به فایل پیکربندی.
گزینههای Cucumber را میتوان در فایل پیکربندی با cucumberOpts ارائه کرد. لیست کامل گزینهها را اینجا بررسی کنید.
برای شروع سریع با Cucumber، پروژه cucumber-boilerplate ما را بررسی کنید که با تمام تعاریف قدم که برای شروع نیاز دارید همراه است، و شما بلافاصله شروع به نوشتن فایلهای ویژگی خواهید کرد.
گزینههای Cucumber
گزینههای زیر را میتوان در wdio.conf.js شما برای پیکربندی محیط Cucumber با استفاده از ویژگی cucumberOpts اعمال کرد:
گزینههای cucumberOpts، مانند tags سفارشی برای فیلتر کردن تستها، میتوانند از طریق خط فرمان مشخص شوند. این کار با استفاده از فرمت cucumberOpts.{optionName}="value" انجام میشود.
به عنوان مثال، اگر میخواهید فقط تستهایی را اجرا کنید که با برچسب @smoke برچسبگذاری شدهاند، میتوانید از دستور زیر استفاده کنید:
# زمانی که فقط میخواهید تستهایی را اجرا کنید که برچسب "@smoke" دارند
npx wdio run ./wdio.conf.js --cucumberOpts.tags="@smoke"
npx wdio run ./wdio.conf.js --cucumberOpts.name="some scenario name" --cucumberOpts.failFast
این دستور گزینه tags را در cucumberOpts به @smoke تنظیم میکند، و اطمینان میدهد که فقط تستهایی با این برچسب اجرا میشوند.
backtrace
نمایش کامل backtrace برای خطاها.
نوع: Boolean
پیشفرض: true
requireModule
ماژولهای مورد نیاز قبل از نیاز به هر فایل پشتیبانی.
نوع: string[]
پیشفرض: []
مثال:
cucumberOpts: {
    requireModule: ['@babel/register']
    // یا
    requireModule: [
        [
            '@babel/register',
            {
                rootMode: 'upward',
                ignore: ['node_modules']
            }
        ]
    ]
 }
failFast
توقف اجرا پس از اولین شکست.
نوع: boolean
پیشفرض: false
name
فقط سناریوهایی را اجرا کنید که نام آنها با عبارت مطابقت دارد (قابل تکرار).
نوع: RegExp[]
پیشفرض: []
require
فایلهای حاوی تعاریف قدم شما را قبل از اجرای ویژگیها لازم بدانید. همچنین میتوانید یک الگو را برای تعاریف قدم خود مشخص کنید.
نوع: string[]
پیشفرض: []
مثال:
cucumberOpts: {
    require: [path.join(__dirname, 'step-definitions', 'my-steps.js')]
}
import
مسیرهایی به محل کد پشتیبانی شما، برای ESM.
نوع: String[]
پیشفرض: []
مثال:
cucumberOpts: {
    import: [path.join(__dirname, 'step-definitions', 'my-steps.js')]
}
strict
اگر هر قدم تعریف نشده یا در حال انتظار وجود داشته باشد، شکست بخورد.
نوع: boolean
پیشفرض: false
tags
فقط ویژگیها یا سناریوهایی را با برچسبهایی که با عبارت مطابقت دارند اجرا کنید. لطفاً برای جزئیات بیشتر مستندات Cucumber را ببینید.
نوع: String
پیشفرض: ``
timeout
زمان انتظار به میلیثانیه برای تعاریف قدم.
نوع: Number
پیشفرض: 30000
retry
تعداد دفعات تلاش مجدد برای موارد تست شکست خورده را مشخص کنید.
نوع: Number
پیشفرض: 0
retryTagFilter
فقط ویژگیها یا سناریوهایی را با برچسبهایی که با عبارت مطابقت دارند تلاش مجدد کنید (قابل تکرار). این گزینه نیاز به مشخص شدن '--retry' دارد.
نوع: RegExp
language
زبان پیشفرض برای فایلهای ویژگی شما
نوع: String
پیشفرض: en
order
اجرای تستها به ترتیب تعریف شده / تصادفی
نوع: String
پیشفرض: defined
format
نام و مسیر فایل خروجی فرمتدهنده برای استفاده. WebdriverIO به طور اصلی فقط از Formatters که خروجی را به یک فایل مینویسند پشتیبانی میکند.
نوع: string[]
formatOptions
گزینههایی که باید به فرمتدهندهها ارائه شوند
نوع: object
tagsInTitle
افزودن برچسبهای cucumber به نام ویژگی یا سناریو
نوع: Boolean
پیشفرض: false
لطفاً توجه داشته باشید که این یک گزینه خاص @wdio/cucumber-framework است و توسط خود cucumber-js شناخته نمیشود
ignoreUndefinedDefinitions
تعاریف تعریف نشده را به عنوان هشدار در نظر بگیرید.
نوع: Boolean
پیشفرض: false
لطفاً توجه داشته باشید که این یک گزینه خاص @wdio/cucumber-framework است و توسط خود cucumber-js شناخته نمیشود
failAmbiguousDefinitions
تعاریف مبهم را به عنوان خطا در نظر بگیرید.
نوع: Boolean
پیشفرض: false
لطفاً توجه داشته باشید که این یک گزینه خاص @wdio/cucumber-framework است و توسط خود cucumber-js شناخته نمیشود
tagExpression
فقط ویژگیها یا سناریوهایی را با برچسبهایی که با عبارت مطابقت دارند اجرا کنید. لطفاً برای جزئیات بیشتر مستندات Cucumber را ببینید.
نوع: String
پیشفرض: ``
لطفاً توجه کنید که این گزینه در آینده منسوخ خواهد شد. به جای آن از ویژگی پیکربندی tags استفاده کنید
profile
پروفایل مورد استفاده را مشخص کنید.
نوع: string[]
پیشفرض: []
لطفاً توجه داشته باشید که فقط مقادیر خاصی (worldParameters، name، retryTagFilter) در پروفایلها پشتیبانی میشوند، زیرا cucumberOpts اولویت دارد. علاوه بر این، هنگام استفاده از یک پروفایل، مطمئن شوید که مقادیر ذکر شده در cucumberOpts اعلام نشدهاند.
رد کردن تستها در cucumber
توجه کنید که اگر میخواهید تستی را با استفاده از قابلیتهای فیلتر کردن تست معمولی cucumber که در cucumberOpts در دسترس است رد کنید، این کار را برای همه مرورگرها و دستگاههای پیکربندی شده در امکانات انجام میدهید. برای اینکه بتوانید سناریوها را فقط برای ترکیبهای خاص امکانات بدون شروع یک جلسه در صورت عدم نیاز رد کنید، webdriverio نحو تگ خاص زیر را برای cucumber ارائه میدهد:
@skip([condition])
که شرط یک ترکیب اختیاری از ویژگیهای امکانات با مقادیر آنهاست که وقتی همه با سناریو یا ویژگی برچسبگذاری شده مطابقت داشته باشند، باعث رد شدن آن میشوند. البته میتوانید چندین برچسب به سناریوها و ویژگیها اضافه کنید تا یک تست را تحت چندین شرایط مختلف رد کنید.
همچنین میتوانید از برچسب '@skip' برای رد کردن تستها بدون تغییر 'tagExpression' استفاده کنید. در این صورت تستهای رد شده در گزارش تست نمایش داده میشوند.
در اینجا چند م�ثال از این نحو را مشاهده میکنید:
@skipیا@skip(): همیشه مورد برچسبگذاری شده را رد میکند@skip(browserName="chrome"): تست در مرورگرهای chrome اجرا نخواهد شد.@skip(browserName="firefox";platformName="linux"): تست را در اجراهای firefox روی linux رد میکند.@skip(browserName=["chrome","firefox"]): موارد برچسبگذاری شده برای هر دو مرورگر chrome و firefox رد میشوند.@skip(browserName=/i.*explorer/): امکاناتی با مرورگرهایی که با regexp مطابقت دارند رد میشوند (مانندiexplorer،internet explorer،internet-explorerو ...).
وارد کردن کمککننده تعریف قدم
برای استفاده از کمککننده تعریف قدم مانند Given، When یا Then یا هوکها، باید آنها را از @cucumber/cucumber وارد کنید، مثلاً به این صورت:
import { Given, When, Then } from '@cucumber/cucumber'
حالا، اگر از Cucumber برای انواع دیگری از تستها که با WebdriverIO بیارتباط هستند و برای آنها از یک نسخه خاص استفاده میکنید، باید این کمککنندهها را در تستهای e2e خود از بسته Cucumber WebdriverIO وارد کنید، مثلاً:
import { Given, When, Then, world, context } from '@wdio/cucumber-framework'
این اطمینان میدهد که از کمک�کنندههای مناسب در چارچوب WebdriverIO استفاده میکنید و به شما امکان میدهد از یک نسخه مستقل Cucumber برای انواع دیگر تست استفاده کنید.
انتشار گزارش
Cucumber ویژگیای برای انتشار گزارشهای اجرای تست خود به https://reports.cucumber.io/ ارائه میدهد، که میتواند با تنظیم پرچم publish در cucumberOpts یا با پیکربندی متغیر محیطی CUCUMBER_PUBLISH_TOKEN کنترل شود. با این حال، وقتی از WebdriverIO برای اجرای تست استفاده میکنید، محدودیتی با این رویکرد وجود دارد. این روش گزارشها را به طور جداگانه برای هر فایل ویژگی بهروز میکند، که مشاهده یک گزارش یکپارچه را دشوار میسازد.
برای غلبه بر این محدودیت، یک روش مبتنی بر promise به نام publishCucumberReport در @wdio/cucumber-framework معرفی کردهایم. این روش باید در هوک onComplete فراخوانی شود، که مکان بهینه برای فراخوانی آن است. publishCucumberReport نیاز به ورودی دایرکتوری گزارش دارد که گزارشهای پیام cucumber در آن ذخیره میشوند.
میتوانید گزارشهای cucumber message را با پیکربندی گزینه format در cucumberOpts خود تولید کنید. به شدت توصیه میشود یک نام فایل پویا در گزینه فرمت cucumber message ارائه دهید تا از بازنویسی گزارشها جلوگیری شود و اطمینان حاصل شود که هر اجرای تست به درستی ثبت میشود.
قبل از استفاده از این تابع، مطمئن شوید که متغیرهای محیطی زیر را تنظیم کردهاید:
- CUCUMBER_PUBLISH_REPORT_URL: URL که میخواهید گزارش Cucumber را در آن منتشر کنید. اگر ارائه نشود، URL پیشفرض 'https://messages.cucumber.io/api/reports' استفاده خواهد شد.
- CUCUMBER_PUBLISH_REPORT_TOKEN: توکن مجوز مورد نیاز برای انتشار گزارش. اگر این توکن تنظیم نشده باشد، تابع بدون انتشار گزارش خارج میشود.
در اینجا نمونهای از پیکربندیهای لازم و نمونههای کد برای پیادهسازی آورده شده است:
import { v4 as uuidv4 } from 'uuid'
import { publishCucumberReport } from '@wdio/cucumber-framework';
export const config = {
// ... گزینههای پیکربندی دیگر
cucumberOpts: {
// ... پیکربندی گزینههای Cucumber
format: [
['message', `./reports/${uuidv4()}.ndjson`],
['json', './reports/test-report.json']
]
},
async onComplete() {
await publishCucumberReport('./reports');
}
}
لطفاً توجه داشته باشید که ./reports/ دایرکتوری است که گزارشهای cucumber message در آن ذخیره خواهند شد.
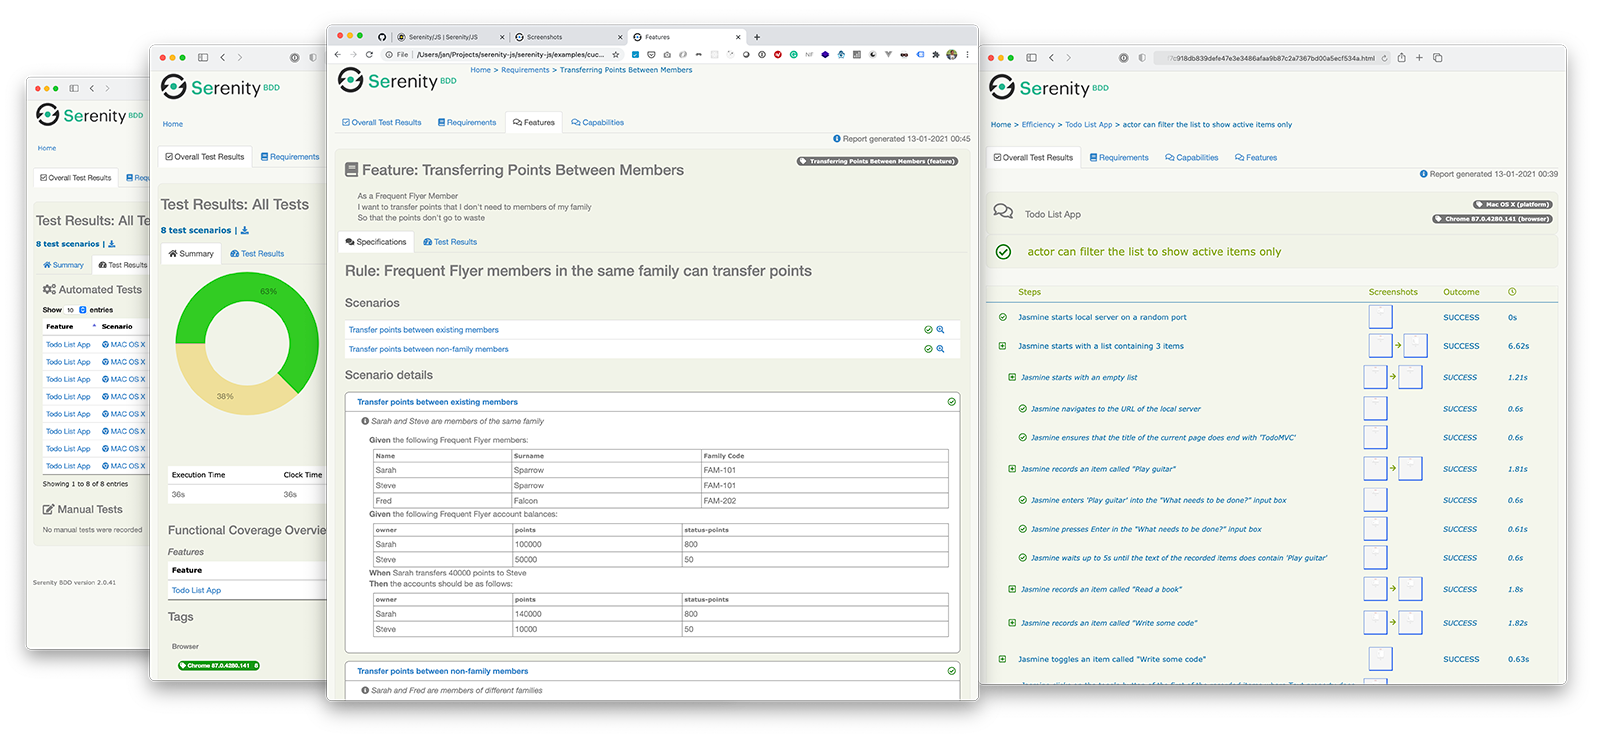
استفاده از Serenity/JS
Serenity/JS یک فریمورک متنباز است که برای سریعتر، مشارکتیتر و مقیاسپذیرتر کردن تست پذیرش و رگرسیون سیستمهای نرمافزاری پیچیده طراحی شده است.
برای سوئیتهای تست WebdriverIO، Serenity/JS موارد زیر را ارائه می��دهد:
- گزارشدهی پیشرفته - میتوانید از Serenity/JS به عنوان جایگزین هر فریمورک داخلی WebdriverIO استفاده کنید تا گزارشهای عمیق اجرای تست و مستندات زنده از پروژه خود تولید کنید.
- APIهای الگوی Screenplay - برای قابل حمل و قابل استفاده مجدد کردن کد تست خود در پروژهها و تیمها، Serenity/JS یک لایه انتزاعی اختیاری در بالای APIهای بومی WebdriverIO ارائه میدهد.
- کتابخانههای ادغام - برای سوئیتهای تست که از الگوی Screenplay پیروی میکنند، Serenity/JS همچنین کتابخانههای ادغام اختیاری برای کمک به نوشتن تستهای API، مدیریت سرورهای محلی، انجام assertion ها و موارد دیگر ارائه میدهد!
نصب Serenity/JS
برای افزودن Serenity/JS به یک پروژه WebdriverIO موجود، ماژولهای Serenity/JS زیر را از NPM نصب کنید:
- npm
- Yarn
- pnpm
npm install @serenity-js/{core,web,webdriverio,assertions,console-reporter,serenity-bdd} --save-dev
yarn add @serenity-js/{core,web,webdriverio,assertions,console-reporter,serenity-bdd} --dev
pnpm add @serenity-js/{core,web,webdriverio,assertions,console-reporter,serenity-bdd} --save-dev
بیشتر درباره ماژولهای Serenity/JS بیاموزید:
@serenity-js/core@serenity-js/web@serenity-js/webdriverio@serenity-js/assertions@serenity-js/console-reporter@serenity-js/serenity-bdd
پیکربندی Serenity/JS
برای فعال کردن ادغام با Serenity/JS، WebdriverIO را به صورت زیر پیکربندی کنید:
- TypeScript
- JavaScript
import { WebdriverIOConfig } from '@serenity-js/webdriverio';
export const config: WebdriverIOConfig = {
// به WebdriverIO بگویید از فریمورک Serenity/JS استفاده کند
framework: '@serenity-js/webdriverio',
// پیکربندی Serenity/JS
serenity: {
// پیکربندی Serenity/JS برای استفاده از آداپتور مناسب برای test runner شما
runner: 'cucumber',
// runner: 'mocha',
// runner: 'jasmine',
// ثبت سرویسهای گزارشدهی Serenity/JS، همچنین معروف به "stage crew"
crew: [
// اختیاری، نتایج اجرای تست را به خروجی استاندارد چاپ کنید
'@serenity-js/console-reporter',
// اختیاری، گزارشها و مستندات زنده Serenity BDD تولید کنید (HTML)
'@serenity-js/serenity-bdd',
[ '@serenity-js/core:ArtifactArchiver', { outputDirectory: 'target/site/serenity' } ],
// اختیاری، به طور خودکار در صورت شکست تعامل عکس بگیرید
[ '@serenity-js/web:Photographer', { strategy: 'TakePhotosOfFailures' } ],
]
},
// پیکربندی runner Cucumber خود
cucumberOpts: {
// گزینههای پیکربندی Cucumber را در زیر ببینید
},
// ... یا runner Jasmine
jasmineOpts: {
// گزینههای پیکربندی Jasmine را در زیر ببینید
},
// ... یا runner Mocha
mochaOpts: {
// گزینههای پیکربندی Mocha را در زیر ببینید
},
runner: 'local',
// هر پیکربندی دیگر WebdriverIO
};
export const config = {
// به WebdriverIO بگویید از فریمورک Serenity/JS استفاده کند
framework: '@serenity-js/webdriverio',
// پیکربندی Serenity/JS
serenity: {
// پیکربندی Serenity/JS برای استفاده از آداپتور مناسب برای test runner شما
runner: 'cucumber',
// runner: 'mocha',
// runner: 'jasmine',
// ثبت سرویسهای گزارشدهی Serenity/JS، همچنین معروف به "stage crew"
crew: [
'@serenity-js/console-reporter',
'@serenity-js/serenity-bdd',
[ '@serenity-js/core:ArtifactArchiver', { outputDirectory: 'target/site/serenity' } ],
[ '@serenity-js/web:Photographer', { strategy: 'TakePhotosOfFailures' } ],
]
},
// پیکربندی runner Cucumber خود
cucumberOpts: {
// گزینههای پیکربندی Cucumber را در زیر ببینید
},
// ... یا runner Jasmine
jasmineOpts: {
// گزینههای پیکربندی Jasmine را در زیر ببینید
},
// ... یا runner Mocha
mochaOpts: {
// گزینههای پیکربندی Mocha را در زیر ببینید
},
runner: 'local',
// هر پیکربندی دیگر WebdriverIO
};
بیشتر بیاموزید درباره:
- گزینههای پیکربندی Cucumber Serenity/JS
- گزینههای پیکربندی Jasmine Serenity/JS
- گزینههای پیکربندی Mocha Serenity/JS
- فایل پیکربندی WebdriverIO
تولید گزارشها و مستندات زنده Serenity BDD
گزارشها و مستندات زنده Serenity BDD توسط Serenity BDD CLI تولید میشوند،
یک برنامه جاوا که توسط ماژول @serenity-js/serenity-bdd دانلود و مدیریت میشود.
برای تولید گزارشهای Serenity BDD، سوئیت تست شما باید:
- Serenity BDD CLI را دانلود کند، با فراخوانی
serenity-bdd updateکه CLIjarرا به صورت محلی کش میکند - گزارشهای میانی Serenity BDD
.jsonتولید کند، با ثبتSerenityBDDReporterمطابق با دستورالعملهای پیکربندی - Serenity BDD CLI را زمانی که میخواهید گزارش تولید کنید فراخوانی کنید، با فراخوانی
serenity-bdd run
الگوی مورد استفاده توسط همه قالبهای پروژه Serenity/JS بر استفاده از موارد زیر متکی است:
- یک اسکریپت NPM
postinstallبرای دانلود Serenity BDD CLI npm-failsafeبرای اجرای فرآیند گزارشدهی حتی اگر خود سوئیت تست شکست خورده باشد (که دقیقاً زمانی است که بیشتر از همه به گزارشهای تست نیاز دارید...).rimrafبه عنوان یک روش راحت برای حذف هرگونه گزارش تست باقیمانده از اجرای قبلی
{
  "scripts": {
    "postinstall": "serenity-bdd update",
    "clean": "rimraf target",
    "test": "failsafe clean test:execute test:report",
    "test:execute": "wdio wdio.conf.ts",
    "test:report": "serenity-bdd run"
  }
}
برای آموختن بیشتر درباره SerenityBDDReporter، لطفاً مراجعه کنید به:
- دستورالعملهای نصب در مستندات
@serenity-js/serenity-bdd، - نمونههای پیکربندی در مستندات API
SerenityBDDReporter، - نمونههای Serenity/JS در GitHub.
استفاده از APIهای الگوی Screenplay Serenity/JS
الگوی Screenplay یک رویکرد نوآورانه و کاربرمحور برای نوشتن تستهای پذیرش خودکار با کیفیت بالا است. این الگو شما را به سمت استفاده موثر از لایههای انتزاع هدایت میکند، به سناریوهای تست شما کمک میکند تا اصطلاحات تجاری دامنه شما را به خود بگیرد، و عادتهای خوب تست و مهندسی نرمافزار را در تیم شما تشویق میکند.
به طور پیشفرض، وقتی @serenity-js/webdriverio را به عنوان framework WebdriverIO خود ثبت میکنید،
Serenity/JS یک گروه پیشفرض از بازیگران را پیکربندی میکند،
که هر بازیگر میتواند:
این باید برای کمک به شما در شروع معرفی سناریوهای تست که از الگوی Screenplay پیروی میکنند حتی به یک سوئیت تست موجود کافی باشد، برای مثال:
import { actorCalled } from '@serenity-js/core'
import { Navigate, Page } from '@serenity-js/web'
import { Ensure, equals } from '@serenity-js/assertions'

describe('My awesome website', () => {
    it('can have test scenarios that follow the Screenplay Pattern', async () => {
        await actorCalled('Alice').attemptsTo(
            Navigate.to(`https://webdriver.io`),
            Ensure.that(
                Page.current().title(),
                equals(`WebdriverIO · Next-gen browser and mobile automation test framework for Node.js | WebdriverIO`)
            ),
        )
    })

    it('can have non-Screenplay scenarios too', async () => {
        await browser.url('https://webdriver.io')
        await expect(browser)
            .toHaveTitle('WebdriverIO · Next-gen browser and mobile automation test framework for Node.js | WebdriverIO')
    })
})
برای آموختن بیشتر درباره الگوی Screenplay، بررسی کنید:
