சோதனை இயக்கி
WebdriverIO அதன் சொந்த சோதனை இயக்கியுடன் வருகிறது, இது உங்களை விரைவாக சோதனைகளைத் தொடங்க உதவுகிறது. இது உங்களுக்காக அனைத்து வேலைகளையும் செய்ய வேண்டும், மூன்றாம் தரப்பு சேவைகளுடன் ஒருங்கிணைக்க அனுமதிக்கிறது, மற்றும் உங்கள் சோதனைகளை முடிந்தவரை திறமையாக இயக்க உதவுகிறது.
WebdriverIO-இன் சோதனை இயக்கி @wdio/cli என்ற NPM தொகுப்பில் தனியாக கட்டப்பட்டுள்ளது.
இதை இப்படி நிறுவுங்கள்:
- npm
- Yarn
- pnpm
- Bun
npm install @wdio/cli
yarn add @wdio/cli
pnpm add @wdio/cli
bun add @wdio/cli
கட்டளை வரி இடைமுக உதவியைப் பார்க்க, உங்கள் முனையத்தில் பின்வரும் கட்டளையைத் தட்டச்சு செய்யவும்:
$ npx wdio --help

wdio <command>

Commands:
  wdio config                           Initialize WebdriverIO and setup configuration in
                                        your current project.
  wdio install <type> <name>            Add a `reporter`, `service`, or `framework` to
                                        your WebdriverIO project
  wdio repl <option> [capabilities]     Run WebDriver session in command line
  wdio run <configPath>                 Run your WDIO configuration file to initialize
                                        your tests.

Options:
  --version  Show version number                                       [boolean]
  --help     Show help                                                 [boolean]
அற்புதம்! இப்போது உங்கள் சோதனைகள், திறன்கள் மற்றும் அமைப்புகள் பற்றிய அனைத்து தகவல்களும் அமைக்கப்படும் ஒரு கட்டமைப்பு கோப்பை வரையறுக்க வேண்டும். அந்த கோப்பு எப்படி இருக்க வேண்டும் என்பதைப் பார்க்க கட்டமைப்பு கோப்பு பிரிவுக்குச் செல்லவும்.
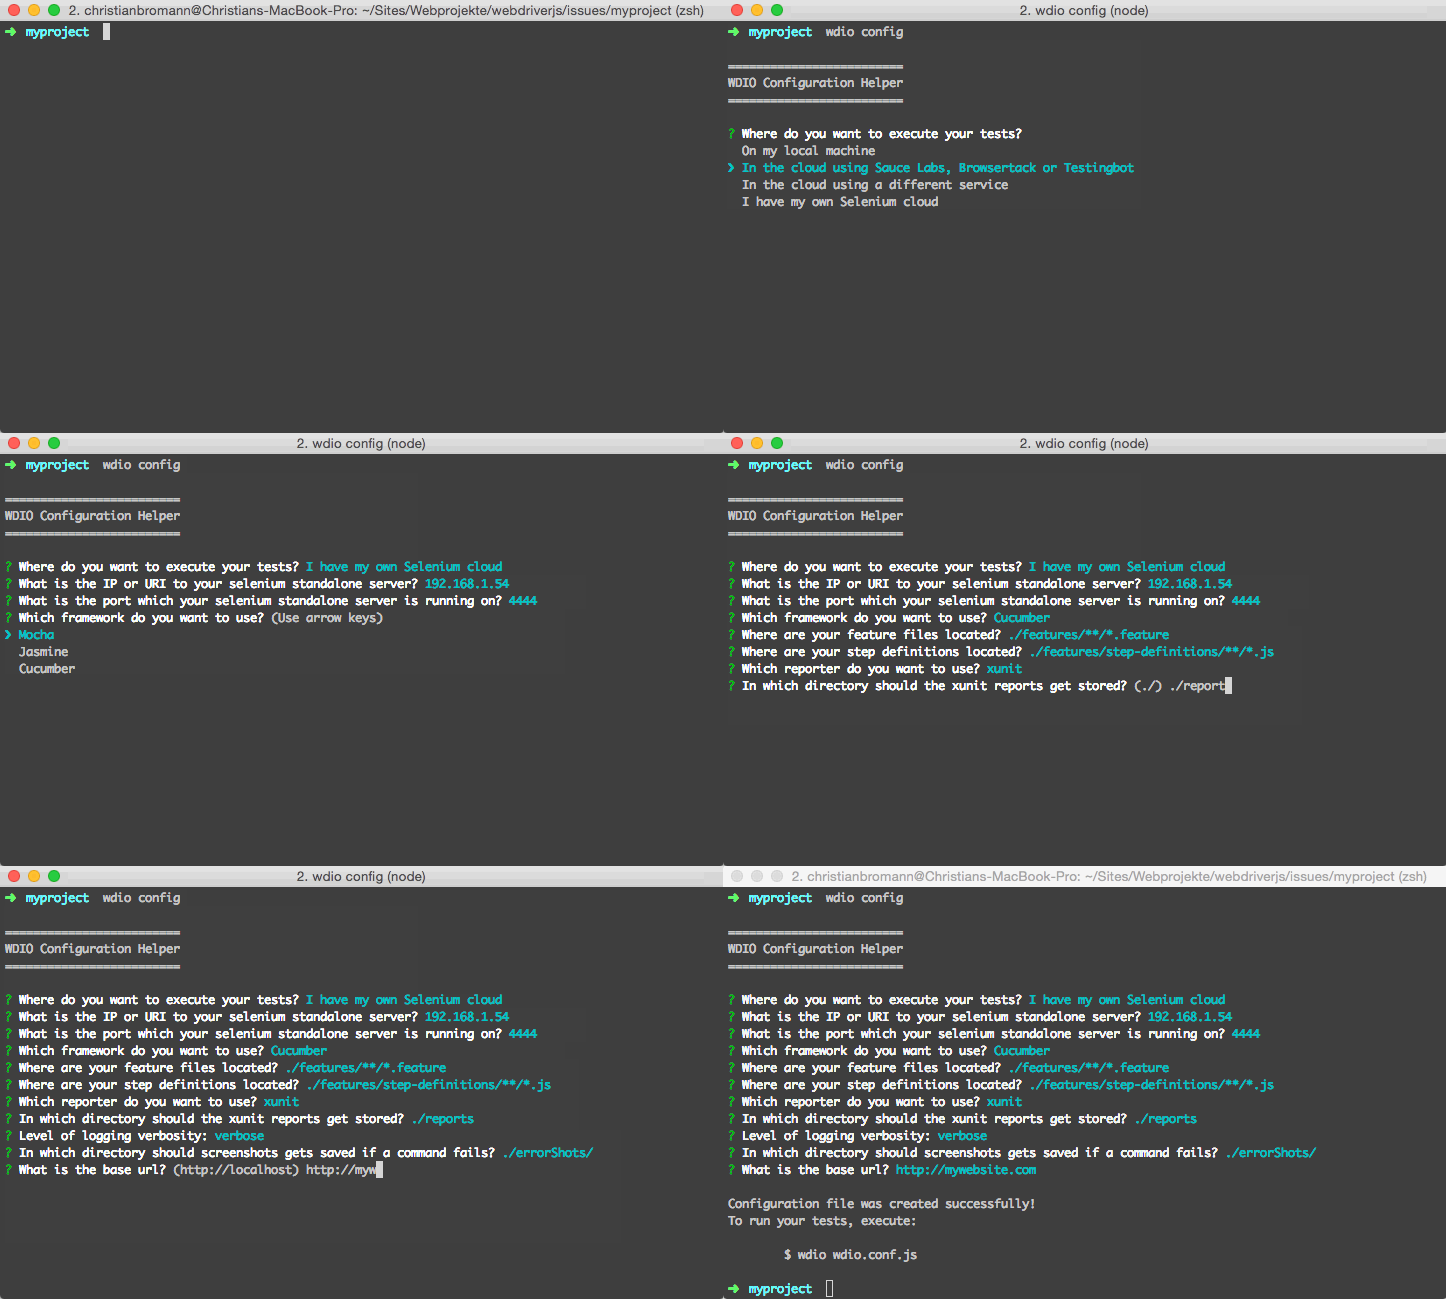
wdio கட்டமைப்பு உதவியுடன், உங்கள் கட்டமைப்பு கோப்பை உருவாக்குவது மிகவும் எளிது. இதை இயக்கவும்:
$ npx wdio config
...இது உதவி கருவியை துவக்குகிறது.
இது உங்களிடம் கேள்விகளைக் கேட்கும் மற்றும் ஒரு நிமிடத்திற்கும் குறைவான நேரத்தில் உங்களுக்கான கட்டமைப்பு கோப்பை உருவாக்கும்.

உங்கள் கட்டமைப்பு கோப்பை அமைத்த பிறகு, நீங்கள் இயக்குவதன் மூலம் உங்கள் சோதனைகளைத் தொடங்கலாம்:
npx wdio run wdio.conf.js
நீங்கள் run கட்டளை இல்லாமலும் உங்கள் சோதனையை துவக்கலாம்:
npx wdio wdio.conf.js
அவ்வளவுதான்! இப்போது, நீங்கள் browser என்ற உலகளாவிய மாறி மூலம் செலினியம் நிகழ்வை அணுகலாம்.
கட்டளைகள்
wdio config
config கட்டளை WebdriverIO கட்டமைப்பு உதவியை இயக்குகிறது. இந்த உதவி உங்கள் WebdriverIO திட்டப்பணி பற்றி சில கேள்விகளைக் கேட்கும் மற்றும் உங்கள் பதில்களின் அடிப்படையில் ஒரு wdio.conf.js கோப்பை உருவாக்கும்.
எடுத்துக்காட்டு:
wdio config
விருப்பங்கள்:
--help            prints WebdriverIO help menu                                [boolean]
--npm             Wether to install the packages using NPM instead of yarn    [boolean]
wdio run
இது உங்கள் கட்டமைப்பை இயக்குவதற்கான இயல்புநிலை கட்டளையாகும்.
run கட்டளை உங்கள் WebdriverIO கட்டமைப்பு கோப்பை துவக்குகிறது மற்றும் உங்கள் சோதனைகளை இயக்குகிறது.
எடுத்துக்காட்டு:
wdio run ./wdio.conf.js --watch
விருப்பங்கள்:
--help                prints WebdriverIO help menu                   [boolean]
--version             prints WebdriverIO version                     [boolean]
--hostname, -h        automation driver host address                  [string]
--port, -p            automation driver port                          [number]
--user, -u            username if using a cloud service as automation backend
                                                                        [string]
--key, -k             corresponding access key to the user            [string]
--watch               watch specs for changes                        [boolean]
--logLevel, -l        level of logging verbosity
                            [choices: "trace", "debug", "info", "warn", "error", "silent"]
--bail                stop test runner after specific amount of tests have
                        failed                                          [number]
--baseUrl             shorten url command calls by setting a base url [string]
--waitforTimeout, -w  timeout for all waitForXXX commands             [number]
--framework, -f       defines the framework (Mocha, Jasmine or Cucumber) to
                        run the specs                                   [string]
--reporters, -r       reporters to print out the results on stdout      [array]
--suite               overwrites the specs attribute and runs the defined
                        suite                                            [array]
--spec                run a certain spec file or wildcards - overrides specs piped
                        from stdin                                       [array]
--exclude             exclude spec file(s) from a run - overrides specs piped
                        from stdin                                       [array]
--repeat              Repeat specific specs and/or suites N times        [number]
--mochaOpts           Mocha options
--jasmineOpts         Jasmine options
--cucumberOpts        Cucumber options
--tsConfigPath        Custom path for `tsconfig.json` or use wdio config's [tsConfigPath setting](/docs/configurationfile)
குறிப்பு: தானியங்கி தொகுப்பை
tsxENV மாறிகள் மூலம் எளிதாக கட்டுப்படுத்தலாம். TypeScript ஆவணங்களையும் பார்க்கவும்.
wdio install
install கட்டளை CLI மூலம் உங்கள் WebdriverIO திட்டங்களுக்கு அறிக்கையாளர்கள் மற்றும் சேவைகளை சேர்க்க உங்களை அனுமதிக்கிறது.
எடுத்துக்காட்டு:
wdio install service sauce # installs @wdio/sauce-service
wdio install reporter dot # installs @wdio/dot-reporter
wdio install framework mocha # installs @wdio/mocha-framework
நீங்கள் yarn பயன்படுத்தி தொகுப்புகளை நிறுவ விரும்பினால், நீங்கள் கட்டளைக்கு --yarn கொடியைக் கொடுக்கலாம்:
wdio install service sauce --yarn
உங்கள் WDIO கட்டமைப்பு கோப்பு நீங்கள் வேலை செய்யும் அதே கோப்புறையில் இல்லை என்றால் நீங்கள் ஒரு தனிப்பயன் கட்டமைப்பு பாதையையும் அனுப்பலாம்:
wdio install service sauce --config="./path/to/wdio.conf.js"
ஆதரிக்கப்படும் சேவைகளின் பட்டியல்
sauce
testingbot
firefox-profile
devtools
browserstack
appium
intercept
zafira-listener
reportportal
docker
wiremock
lambdatest
vite
nuxt
ஆதரிக்கப்படும் அறிக்கையாளர்களின் பட்டியல்
dot
spec
junit
allure
sumologic
concise
reportportal
video
html
json
mochawesome
timeline
ஆதரிக்கப்படும் கட்டமைப்புகளின் பட்டியல்
mocha
jasmine
cucumber
wdio repl
repl கட்டளை WebdriverIO கட்டளைகளை இயக்க ஊடாடும் கட்டளை வரி இடைமுகத்தை தொடங்க அனுமதிக்கிறது. இது சோதனை நோக்கங்களுக்காகவோ அல்லது வெறுமனே WebdriverIO அமர்வைத் தொடங்குவதற்காகவோ பயன்படுத்தப்படலாம்.
உள்ளூர் குரோமில் சோதனைகளை இயக்கவும்:
wdio repl chrome
அல்லது Sauce Labs இல் சோதனைகளை இயக்கவும்:
wdio repl chrome -u $SAUCE_USERNAME -k $SAUCE_ACCESS_KEY
run கட்டளையில் செய்வது போலவே அதே அளவுருக்களை நீங்கள் பயன்பட��ுத்தலாம்.
