ஜூனிட் அறிக்கையிடுபவர்
A WebdriverIO reporter that creates Jenkins compatible XML based JUnit reports
நிறுவல்
எளிதான வழி @wdio/junit-reporter ஐ உங்கள் package.json இல் devDependency ஆக வைத்திருப்பது:
npm install @wdio/junit-reporter --save-dev
WebdriverIO எவ்வாறு நிறுவுவது என்பதற்கான வழிமுறைகள் இங்கே காணலாம்.
வெளியீடு
இந்த அறிக்கையாளர் ஒவ்வொரு ரன்னருக்கும் ஒரு அறிக்கையை வெளியிடும், எனவே நீங்கள் ஒவ்வொரு spec கோப்புக்கும் ஒரு xml அறிக்கையைப் பெறுவீர்கள். கீழே spec கோப்பில் வெவ்வேறு சூழ்நிலைகளில் XML வெளியீட்டின் எடுத்துக்காட்டுகள் உள்ளன.
ஒற்றை describe பிளாக்
describe('a test suite', () => {
    it('a test case', function () {
      // do something
      // assert something
    });
});
இவ்வாறு மாறுகிறது
<testsuites>
    <testsuite name="a test suite" timestamp="2019-04-18T13:45:21" time="11.735" tests="0" failures="0" errors="0" skipped="0">
        <properties>
          <property name="specId" value="0"/>
          <property name="suiteName" value="a test suite"/>
          <property name="capabilities" value="chrome"/>
          <property name="file" value=".\test\specs\asuite.spec.js"/>
        </properties>
        <testcase classname="chrome.a_test_case" name="a_test_suite_a_test_case" time="11.706"/>
    </testsuite>
</testsuites>
உட்புகுத்தப்பட்ட describe பிளாக்
describe('a test suite', () => {
    describe('a nested test suite', function() {
        it('a test case', function () {
          // do something
          // assert something
        });
    });
});
இவ்வாறு மாறுகிறது
<testsuites>
    <testsuite name="a test suite" timestamp="2019-04-18T13:45:21" time="11.735" tests="0" failures="0" errors="0" skipped="0">
    <properties>
      <property name="specId" value="0"/>
      <property name="suiteName" value="a test suite"/>
      <property name="capabilities" value="chrome"/>
      <property name="file" value=".\test\specs\asuite.spec.js"/>
    </properties>
  </testsuite>
  <testsuite name="a nested test suite" timestamp="2019-04-18T13:45:21" time="11.735" tests="0" failures="0" errors="0" skipped="0">
    <properties>
      <property name="specId" value="0"/>
      <property name="suiteName" value="a nested test suite"/>
      <property name="capabilities" value="chrome"/>
      <property name="file" value=".\test\specs\asuite.spec.js"/>
    </properties>
    <testcase classname="chrome.a_test_case" name="a nested test suite a test case" time="11.706"/>
  </testsuite>
</testsuites>
பல describe பிளாக்
describe('a test suite', () => {
    it('a test case', function () {
      // do something
      // assert something
    });
});
describe('a second test suite', () => {
    it('a second test case', function () {
      // do something
      // assert something
    });
});
இவ்வாறு மாறுகிறது
<testsuites>
    <testsuite name="a test suite" timestamp="2019-04-18T13:45:21" time="11.735" tests="0" failures="0" errors="0" skipped="0">
    <properties>
      <property name="specId" value="0"/>
      <property name="suiteName" value="a test suite"/>
      <property name="capabilities" value="chrome"/>
      <property name="file" value=".\test\specs\asuite.spec.js"/>
      <testcase classname="chrome.a_test_case" name="a nested test suite a test case" time="11.706"/>
    </properties>
  </testsuite>
  <testsuite name="a second test suite" timestamp="2019-04-18T13:45:21" time="11.735" tests="0" failures="0" errors="0" skipped="0">
    <properties>
      <property name="specId" value="0"/>
      <property name="suiteName" value="a second test suite"/>
      <property name="capabilities" value="chrome"/>
      <property name="file" value=".\test\specs\asuite.spec.js"/>
    </properties>
    <testcase classname="chrome.a_second_test_case" name="a_second_test_suite_a_second_test_case" time="11.706"/>
  </testsuite>
</testsuites>
தோல்விகள் மற்றும் பிழைகள்
அனைத்து சோதனை வழக்கு தோல்விகளும் JUnit சோதனை வழக்கு பிழைகளாக வரைபடமாக்கப்படுகின்றன. உறுதிப்படுத்தல் தோல்வி அல்லது பிழை காரணமாக தோல்வியுற்ற சோதனை வழக்கு இப்படி இருக்கும்:
<testcase classname="chrome.a_test_case" name="a_test_suite_a_test_case" time="0.372">
  <failure message="Error: some error"/>
    <system-err>
        <![CDATA[
Error: some assertion failure
    at UserContext.<anonymous> (C:\repo\webdriver-example\test\specs/a_test_suite.spec.js:22:17)
]]>
  </system-err>
</testcase>
கட்டமைப்பு
கீழே உள்ள குறியீடு இயல்புநிலை wdio சோதனை இயக்கி கட்டமைப்பைக் காட்டுகிறது. வெறுமனே 'junit' ஐ அறிக்கையாளராக அணிக்கு சேர்க்கவும். சோதனையின் போது சில வெளியீட்டைப் பெற நீங்கள் WDIO Dot Reporter மற்றும் WDIO JUnit Reporter ஐ ஒரே நேரத்தில் இயக்கலாம்:
// wdio.conf.js
module.exports = {
    // ...
    reporters: [
        'dot',
        ['junit', {
            outputDir: './',
            outputFileFormat: function(options) { // optional
                return `results-${options.cid}.${options.capabilities}.xml`
            }
        }]
    ],
    // ...
};
பின்வரும் விரு��ப்பங்கள் ஆதரிக்கப்படுகின்றன:
outputDir
உங்கள் xml கோப்புகள் சேமிக்கப்பட வேண்டிய கோப்பகத்தை வரையறுக்கவும்.
வகை: String
தேவையானது
outputFileFormat
சோதனைச் செயல்படுத்தப்பட்ட பின்னர் உருவாக்கப்பட்ட xml கோப்புகளை வரையறுக்கவும்.
வகை: Object
இயல்புநிலை: function (opts) { return `wdio-${this.cid}-${name}-reporter.log` }
outputFileFormat: function (options) {
    return 'mycustomfilename.xml';
}
��குறிப்பு:
options.capabilitiesஎன்பது அந்த ரன்னருக்கான உங்கள் திறன்கள் பொருள், எனவே${options.capabilities}என்பதை உங்கள் சரத்தில் குறிப்பிடுவது [Object object] ஐத் திருப்பித் தரும். உங்கள் கோப்புப் பெயரில் நீங்கள் விரும்பும் திறன்களின் எந்த பண்புகளைக் குறிப்பிட வேண்டும்.
suiteNameFormat
சோதனைத் தொகுப்பு பெயரை வடிவமைப்பதற்கான தனிப்பயன் ரெகெக்ஸை வழங்கும் திறன் (எ.கா. வெளியீட்டு xml இல்).
வகை: Regex,
இயல்புநிலை: /[^a-zA-Z0-9@]+/
// wdio.conf.js
module.exports = {
    // ...
    reporters: [
        'dot',
        ['junit', {
            outputDir: './',
            suiteNameFormat: /[^a-zA-Z0-9@]+/
            outputFileFormat: function(options) { // optional
                return `results-${options.cid}.${options.capabilities}.xml`
            }
        }]
    ],
    // ...
};
addFileAttribute
ஒவ்வொரு சோதனை வழக்கிற்கும் ஒரு கோப்பு பண்புக்கூறைச் சேர்க்கிறது. இந்த கட்டமைப்பு முதன்மையாக CircleCI க்கானது. இந்த அமைப�்பு சிறந்த விவரங்களை வழங்குகிறது ஆனால் மற்ற CI தளங்களில் சிதைவதற்கு வாய்ப்புள்ளது.
வகை: Boolean,
இயல்புநிலை: false
packageName
'packageName' ஐ அமைப்பதன் மூலம் தொகுப்புகளை கூடுதல் நிலையில் பிரிக்கலாம். எடுத்துக்காட்டாக, வித்தியாசமான சுற்றுச்சூழல் மாறி அமைப்புடன் சோதனைத் தொகுப்பில் திரும்பத் திரும்ப பயன்படுத்த விரும்பினால்:
வகை: String
எடுத்துக்காட்டு:
// wdio.conf.js
module.exports = {
    // ...
    reporters: [
        'dot',
        ['junit', {
            outputDir: './',
            packageName: process.env.USER_ROLE // chrome.41 - administrator
        }]
    ]
    // ...
};
errorOptions
xml க்குள் பிழை அறிவிப்புகளின் பல்வேறு கலவைகளை அமைக்க அனுமதிக்கிறது.
expect(true).toBe(false, 'my custom message') போன்ற ஜாஸ்மின் சோதனையைக் கொடுத்தால், இந்த சோதனைப் பிழையைப் பெறுவீர்கள்:
{
    matcherName: 'toBe',
    message: 'Expected true to be false, \'my custom message\'.',
    stack: 'Error: Expected true to be false, \'my custom message\'.\n    at UserContext.it (/home/mcelotti/Workspace/WebstormProjects/forcebeatwio/test/marco/prova1.spec.js:3:22)',
    passed: false,
    expected: [ false, 'my custom message' ],
    actual: true
}
எனவே நீங்கள் எந்த விசை எங்கே பயன்படுத்தப்படும் என்பதைத் தேர்வு செய்யலாம், கீழே உள்ள எடுத்துக்காட்டைப் பார்க்கவும்.
வகை: Object,
இயல்புநிலை: errorOptions: { error: "message" }
எடுத்துக்காட்டு:
// wdio.conf.js
module.exports = {
    // ...
    reporters: [
        'dot',
        ['junit', {
            outputDir: './',
            errorOptions: {
                error: 'message',
                failure: 'message',
                stacktrace: 'stack'
            }
        }]
    ],
    // ...
};
addWorkerLogs
விருப்ப அளவுரு, சோதனையில் இருந்து கன்சோல் பதிவுகளை அறிக்கையிடுபவரில் இணைக்க இந்த அளவுருவை true என அமைக்கவும்.
வகை: Boolean
இயல்புநிலை: false
எடுத்துக்காட்டு:
// wdio.conf.js
module.exports = {
    // ...
    reporters: [
        'dot',
        ['junit', {
            outputDir: './',
            addWorkerLogs: true
        }]
    ],
    // ...
};
சோதனை வழக்குகளுக்கு தனிப்பயன் பண்புகளைச் சேர்த்தல்
இந்த plugin ஒரு செயல்பாட்டை வழங்குகிறது addProperty(name, value). தற்போது இயங்கும் சோதனை படிக்கு கூடுதல் junit சோதனை வழக்கு பண்புகளைச் சேர்க்க இந்த செயல்பாட்டைப் பயன்படுத்தலாம். இந்த பண்புகள் விளைவு xml இல் <property name="${name}" value="${value}" /> என அறிக்கையிடப்படும்.
இதற்கான வழக்கமான பயன்பாடு என்னவென்றால் ஒரு சிக்கலுக்கோ அல்லது சோதனை வழக்குக்கோ ஒரு இணைப்பைச் சேர்ப்பதாகும்.
பயன்பாட்டு எடுத்துக்காட்டு
Mocha க்கு ஒரு எடுத்துக்காட்டு:
import { addProperty } from '@wdio/junit-reporter'

describe('Suite', () => {
    it('Case', () => {
        addProperty('test_case', 'TC-1234')
    })
})
Jenkins அமைப்பு
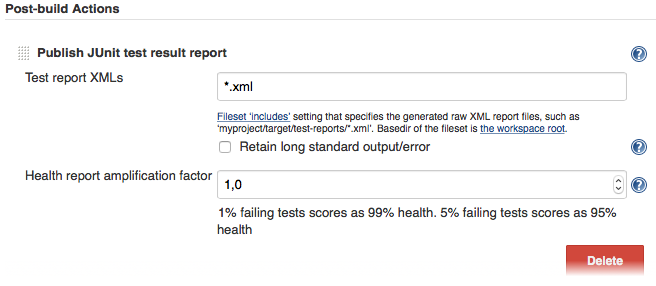
இறுதியாக, உங்கள் CI ஜாப்பிற்கு (எ.கா. Jenkins) xml கோப்பை எங்கே காணலாம் என்பதை நீங்கள் கூற வேண்டும். அதைச் செய்ய, சோதனை ஓடிய பிறகு செயல்படுத்தப்படும் உங்கள் ஜாப்பிற்கு ஒரு post-build செயலை சேர்த்து, Jenkins (அல்லது உங்கள் விரும்பிய CI அமைப்பு) ஐ உங்கள் XML சோதனை முடிவுகளுக்கு சுட்டிக்காட்டவும்:

உங்கள் CI அமைப்பில் அத்தகைய post-build படி இல்லையெனில், இணையத்தில் எங்காவது அதற்கான plugin இருக்கலாம்.
WebdriverIO பற்றிய கூடுதல் தகவலுக்கு முகப்பு பக்கத்தைப் பார்க்கவும்.
